A Shared GPU Cluster with Slurm and BeeGFS
A handful of GPU servers shared by a team tends to go through the same stages. At first people SSH into whichever machine looks idle. Then someone’s job gets killed because two people picked the same GPU. Then datasets end up copied onto every machine, each copy slightly different.
A job scheduler fixes the first two; a shared filesystem fixes the third. This post walks through the setup I use: one login node plus a few GPU servers, with Slurm for scheduling, BeeGFS for a shared /home, UFW as the host firewall, and Ansible to keep every node consistent.
The goal is a cluster that stays simple at three nodes but does not need to be re-architected at ten. Adding a GPU server should never mean hand-editing the existing ones.
Compatibility: This guide uses Ubuntu 26.04 LTS, Slurm 25.11 (from the Ubuntu archive), BeeGFS 8.4 and Ansible core 2.20. Most of it applies to other releases, but two of the pitfalls below (
sudo-rsand GPU TRES withoutslurmdbd) are specific to these versions.
Architecture
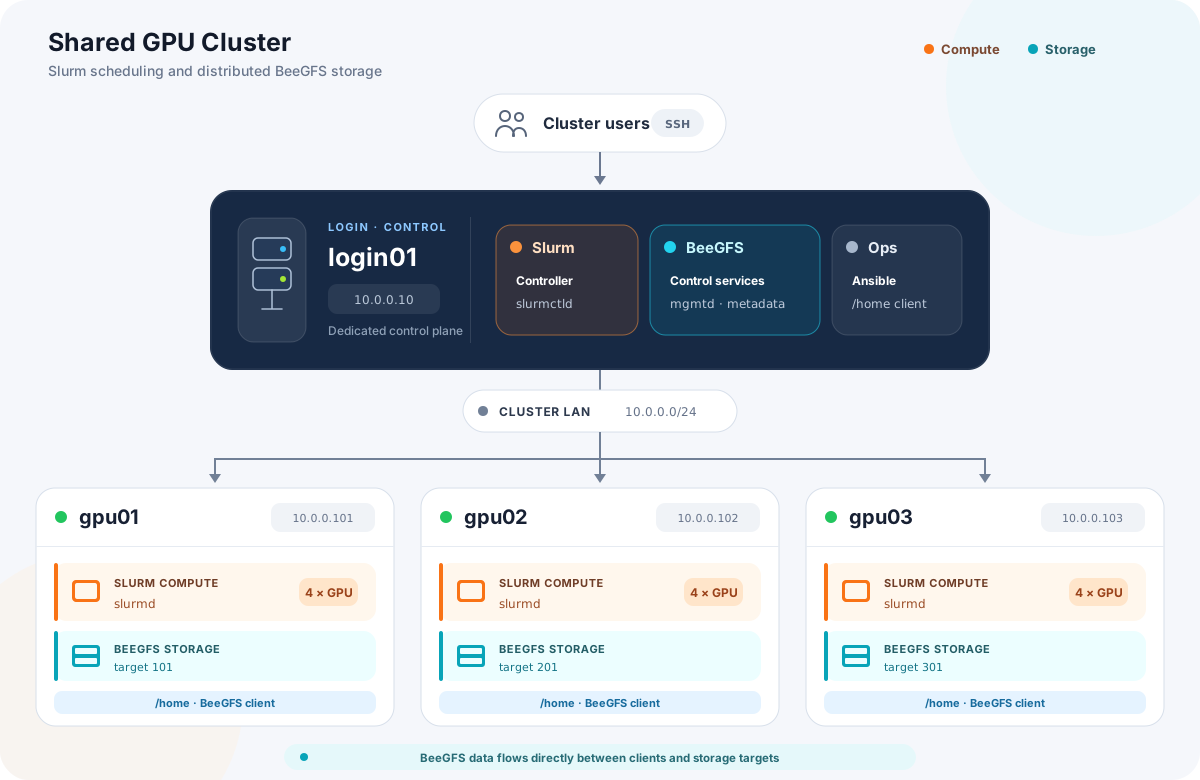
A few decisions shape everything else:
- The login node is also the control plane. It runs the Slurm controller and the BeeGFS management and metadata services. GPU servers are the machines most likely to be rebooted for driver updates or hardware work, so the control plane stays off them.
- The shared filesystem is mounted at
/home. Code, environments and datasets are visible at the same path on every node, so jobs never need to stage data. - Identity is plain local POSIX users, kept identical on every node by Ansible. No LDAP; this is fine at this scale as long as UIDs never drift.
- Users log in only to
login01. GPU servers accept SSH only from the login node and only for administrators. Jobs still run there as normal users, becauseslurmdlaunches them without going throughsshd.
Why BeeGFS Instead of NFS?
NFS exported from the login node is the obvious alternative, and it works for a couple of machines. The problem is that every byte of every read and write passes through the NFS server.
BeeGFS separates metadata from data. The login node only answers “where does this file live?”; the file contents move directly between clients and storage servers. Every GPU server contributes its local disks as a storage target, so adding a server adds both compute and storage bandwidth.
Preparing the Nodes
Every machine needs a few manual steps first:
- Install Ubuntu 26.04 LTS and set the hostname (
login01,gpu01, …). Make sure every hostname resolves through DNS on every node; Slurm uses these names to reach nodes. - Create an administration account (I use
admin, UID 1000, in thesudogroup) with your SSH key. This account is deliberately not a cluster user. - Enable time synchronization. MUNGE rejects credentials when clocks drift apart.
- On GPU servers, install the NVIDIA driver and check that
nvidia-smi -Llists every GPU. Then restrict SSH to administrators by puttingAllowGroups sudoin/etc/ssh/sshd_config.d/90-allow-sudo.confand reloadingssh.
Shared Storage with BeeGFS
BeeGFS is set up by hand rather than through Ansible. Initializing a metadata or storage target is a one-time, destructive operation, and I would rather type it deliberately than have a playbook re-run it. For repository setup and packages, follow the BeeGFS quick start; the parts below are the decisions it leaves to you.
RAID Underneath
BeeGFS (without the enterprise buddy-mirroring feature) does not replicate data, so redundancy has to come from below:
GPU server:  4 × HDD → MD RAID10 → XFS  → /data   → /data/beegfs-storage
login01:     2 × SSD → MD RAID1  → ext4 → /beegfs → meta/, mgmtd/
RAID10 rebuilds and writes faster than RAID5/6, which matters more than capacity efficiency for an active home directory. The metadata store gets RAID1 because losing it loses the whole namespace: the data chunks survive on the storage servers, but nothing knows which file they belong to. Mount both in /etc/fstab by UUID; MD device names are not stable across reboots.
Services and Node IDs
Install linux-headers-$(uname -r) and build-essential alongside beegfs-client: the client builds its kernel module locally and rebuilds it after every kernel upgrade.
BeeGFS authenticates nodes with a single shared secret. Generate it once on login01 and copy the identical file to every node, together with /etc/beegfs/cert.pem (the TLS certificate for the management API):
sudo dd if=/dev/urandom of=/etc/beegfs/conn.auth bs=128 count=1
sudo chmod 400 /etc/beegfs/conn.auth
On login01, set db-file = "/beegfs/mgmtd/mgmtd.sqlite" in /etc/beegfs/beegfs-mgmtd.toml, then initialize management exactly once and set up metadata:
sudo /opt/beegfs/sbin/beegfs-mgmtd --init
sudo /opt/beegfs/sbin/beegfs-setup-meta -p /beegfs/meta -s 1 -m 10.0.0.10
On each GPU server, register the RAID volume as a storage target. I number targets <node>01 (node 1 → target 101, node 2 → target 201), so the node is readable from the target ID:
# on gpu02
sudo /opt/beegfs/sbin/beegfs-setup-storage -p /data/beegfs-storage -s 2 -i 201 -m 10.0.0.10
The Safety Interlock
This is the part most guides skip, and it is the one that protects your data.
Suppose a RAID array fails to assemble at boot. /data is then just an empty directory on the root filesystem. By default, beegfs-storage will happily initialize a brand-new empty target there and join the cluster with it. Your files appear to be gone, and new writes land on the OS disk.
Two settings in /etc/beegfs/beegfs-storage.conf prevent this (set the same two in beegfs-meta.conf on login01, with the UUID of /beegfs):
storeAllowFirstRunInit = false
storeFsUUID            = ,<UUID of the /data filesystem>
With these set, the daemon refuses to start unless the directory sits on the exact filesystem it was created on.
Note: The leading comma in the storage config is not a typo.
storeStorageDirectoryandstoreFsUUIDare comma-separated lists (one entry per target), andbeegfs-setup-storagewritesstoreStorageDirectorywith an empty first element. Keep the two lists aligned. The metadata config takes a single value with no comma.
As a second layer, make systemd refuse to start the service until its filesystem is mounted:
sudo mkdir -p /etc/systemd/system/beegfs-storage.service.d
printf '[Unit]\nRequiresMountsFor=/data\n' \
    | sudo tee /etc/systemd/system/beegfs-storage.service.d/storage.conf
sudo systemctl daemon-reload
On login01, add the same drop-in for beegfs-mgmtd and beegfs-meta with RequiresMountsFor=/beegfs.
Only now start the services: beegfs-mgmtd and beegfs-meta on login01, then beegfs-storage on each GPU server, all with systemctl enable --now.
Mounting the Client
Every node, including login01, runs the client:
sudo /opt/beegfs/sbin/beegfs-setup-client -m 10.0.0.10
echo '/home /etc/beegfs/beegfs-client.conf' | sudo tee /etc/beegfs/beegfs-mounts.conf
sudo systemctl enable --now beegfs-client
findmnt /home     # expect: beegfs_nodev ... beegfs
BeeGFS is mounted over the local /home rather than replacing it. The local directory still exists underneath; in this setup it holds only admin’s home. That is a useful escape hatch (unmount /home and the admin account has a working home again), but it also creates the most confusing failure mode in this setup; see Troubleshooting.
Warning: Anything in the local
/homebecomes invisible once BeeGFS mounts, includingadmin’s~/.ssh/authorized_keys. Before mounting, create/home/adminon BeeGFS with the same keys, or you lose key-based SSH to the node. If the local/homeholds real user data, copy it into BeeGFS first withrsync -aHAX --numeric-idsfrom a separate mountpoint.
Configuration Management with Ansible
Users, MUNGE, Slurm and the firewall are all managed by one playbook, run from login01. The inventory:
all:
  children:
    controller:
      hosts:
        login01:
          ansible_connection: local
    compute:
      hosts:
        gpu01:
        gpu02:
        gpu03:
    beegfs_storage:
      hosts:
        gpu01:
        gpu02:
        gpu03:
  vars:
    ansible_user: admin
    ansible_become_exe: /usr/bin/sudo.ws
compute and beegfs_storage list the same hosts today, but keeping them separate means a future compute-only node does not open storage ports it never uses.
The last line works around an Ubuntu 26.04 pitfall. Ubuntu 26.04 replaces sudo with sudo-rs, whose password prompt differs enough that ansible-playbook -K fails to detect it and hangs or times out. The classic implementation is still installed as /usr/bin/sudo.ws, and pointing ansible_become_exe at it lets -K work without resorting to NOPASSWD: ALL.
site.yml applies five roles: users, firewall and slurm-common on every node, slurm-controller on login01, and slurm-compute on the GPU servers. Every configuration change in the following sections is applied with:
ansible-playbook /etc/ansible/site.yml -K
Users and MUNGE
BeeGFS stores file ownership as numeric UIDs. If alice is UID 1001 on login01 but 1002 on gpu02, her jobs on gpu02 cannot write her own files. Users are therefore defined once, with explicit UIDs, in group_vars/all.yml:
cluster_groups:
  - { name: users, gid: 100 }

cluster_users:
  - { name: alice, uid: 1001, primary_group: users }
  - { name: bob,   uid: 1002, primary_group: users }

removed_cluster_users: []
The users role loops over these with ansible.builtin.group and ansible.builtin.user. Two flags matter. create_home: false, because home directories live on BeeGFS; create each one by hand, once, when adding a user. remove: false when retiring a user, because deleting a local account record must never delete the shared home directory.
Because ownership is numeric, never reuse a UID. A new user who inherits a retired UID silently inherits every file the old user left behind. Keeping retired names in removed_cluster_users doubles as a record of which UIDs are taken.
Slurm signs every message with MUNGE, which needs the same key on every node. Generate it once, keep it in the Ansible tree (and out of Git), and let slurm-common copy it to /etc/munge/munge.key with mode 0400:
sudo mungekey --create --keyfile /etc/ansible/files/munge.key
End that role with meta: flush_handlers. If the key changes, munged must restart before the later plays talk to Slurm, or every call fails with an authentication error.
Slurm
Controller Configuration
The slurm-controller role installs slurmctld and renders three files into /etc/slurm/. The main one is slurm.conf:
ClusterName=cluster
SlurmctldHost=login01
SlurmUser=slurm
AuthType=auth/munge
CredType=cred/munge

StateSaveLocation=/var/spool/slurmctld
SlurmdSpoolDir=/var/spool/slurmd
SlurmctldPort=6817
SlurmdPort=6818
SrunPortRange=60001-61000

SlurmctldParameters=enable_configless,reconfig_on_restart
SchedulerType=sched/backfill
EnforcePartLimits=ANY
ReturnToService=2

GresTypes=gpu
SelectType=select/cons_tres
SelectTypeParameters=CR_Core_Memory
ProctrackType=proctrack/cgroup
TaskPlugin=task/cgroup,task/affinity
JobAcctGatherType=jobacct_gather/cgroup

NodeName=gpu[01-03] CPUs=384 Boards=1 SocketsPerBoard=2 CoresPerSocket=96 ThreadsPerCore=2 RealMemory=500000 Gres=gpu:4 State=UNKNOWN

PartitionName=gpu Nodes=gpu[01-03] Default=YES MaxTime=3-00:00:00 State=UP AllowGroups=users DefMemPerGPU=120000
The lines worth explaining:
enable_configlesslets compute nodes downloadslurm.conffrom the controller instead of keeping their own copy. There is no config file to keep in sync across nodes.SrunPortRangepins the portssrunlistens on for callbacks. Without it,srunpicks random ephemeral ports, which a firewall will block (more on this below).EnforcePartLimits=ANYrejects impossible submissions (too many GPUs, a time limit over the maximum, a user outsideAllowGroups) at submit time instead of leaving themPENDINGforever.ReturnToService=2lets a node that reboots with a valid configuration rejoin on its own.NodeNamevalues come from runningsudo slurmd -Con a GPU server. Do not roundRealMemoryup: if it exceeds what the node reports, Slurm drains the node.AllowGroups=userslimits the partition to cluster users and keeps theadminaccount out of the job path.
Memory: Scheduled, Not Enforced
I want users to be able to submit --gres=gpu:1 without thinking about --mem. That takes two settings working together.
CR_Core_Memory makes memory a schedulable resource, and DefMemPerGPU=120000 gives each job a default of about 120 GB per requested GPU. The default matters more than it looks: without it, a job that omits --mem is allocated all of the node’s memory. The first one-GPU job then blocks every other job on that node, and three GPUs sit idle.
cgroup.conf then decides what is actually enforced:
CgroupPlugin=autodetect
ConstrainCores=yes
ConstrainDevices=yes
ConstrainRAMSpace=no
A job only runs on the cores it was allocated and only sees the GPUs it was allocated. Memory, however, is used for scheduling only: a job that briefly needs more than its default is not OOM-killed. For a team that knows each other, I find this the better trade-off; on a busier cluster, set ConstrainRAMSpace=yes and ask users to size --mem properly.
GPUs and Configless Compute Nodes
gres.conf is a single line, AutoDetect=nvml. Slurm then discovers GPU device files and topology through NVML instead of you listing /dev/nvidia* by hand. I declare GPUs as untyped (gpu:4, not gpu:rtx6000:4) because the cluster has a single GPU model, so users request --gres=gpu:1 without spelling a model name.
The slurm-compute role installs slurmd and slurm-wlm-nvml-plugin (without the plugin, slurmd fails with cannot create gpu context for gpu/nvml), then writes a single line to /etc/default/slurmd:
SLURMD_OPTIONS="--conf-server login01:6817"
That is the entire Slurm configuration on a compute node. slurmd fetches slurm.conf, cgroup.conf and gres.conf from login01 when it starts.
Note: When you run
slurmdby hand for debugging (slurmd -G,slurmd -Dvvv), pass--conf-server login01:6817explicitly. The option in/etc/default/slurmdonly applies to the systemd unit, and without itslurmdfalls back to DNS SRV discovery and fails withfetch_config: DNS SRV lookup failed.
Do Not Enable GPU Accounting Yet
This cluster does not run slurmdbd, the accounting database daemon. It is tempting to add AccountingStorageTRES=gres/gpu anyway to see GPU usage. On Slurm 25.11, slurmctld then refuses to start:
slurmdbd is required to run with TRES gres/gpu
GPU scheduling does not need accounting at all. When you do want job history, fair-share or per-user GPU hours, deploy MariaDB and slurmdbd first, then set AccountingStorageType=accounting_storage/slurmdbd, and only then add the TRES list.
Firewall
The firewall role sets every node to deny inbound traffic by default and then allows only the ports below. This is where most first attempts break in a confusing way.
| Port | Proto | Where | From | Service |
|---|---|---|---|---|
| 22 | TCP | login01 | anywhere | user SSH |
| 22 | TCP | GPU servers | login01 | admin SSH |
| 6817 | TCP | login01 | cluster subnet | slurmctld |
| 6818 | TCP | GPU servers | cluster subnet | slurmd |
| 60001–61000 | TCP | all nodes | cluster subnet | srun callbacks |
| 8003 | TCP/UDP | storage servers | cluster subnet | beegfs-storage |
| 8004 | UDP | all nodes | cluster subnet | beegfs-client callbacks |
| 8005 | TCP/UDP | login01 | cluster subnet | beegfs-meta |
| 8008 | TCP/UDP | login01 | cluster subnet | beegfs-mgmtd |
| 8010 | TCP | login01 | cluster subnet | beegfs-mgmtd gRPC API |
Outbound traffic is allowed, so DNS, NTP and APT need no rules. MUNGE needs none either; munged only talks to local processes over a Unix socket.
Two rows deserve a closer look.
6818 must be open to the whole subnet, not just to login01. It is natural to assume only the controller talks to slurmd. In fact, when a job spans several nodes, slurmd forwards launch requests to other slurmds in a tree, and an srun inside a batch job on gpu01 connects to slurmd on gpu02 directly. Restricting 6818 to login01 works perfectly with one GPU server and breaks multi-node jobs as soon as you add a second.
The srun callback range explains the classic symptom of a new firewall:
sbatch   works
squeue   works
sinfo    works
srun     hangs
sbatch only talks to the controller. srun stays attached to the job: it opens listening ports and waits for the compute nodes to connect back with output and status. SrunPortRange pins those ports so the firewall can allow them. The range is opened on every node because srun also runs inside batch jobs on the GPU servers.
The firewall role turns the table into data, one rule per row, tagged with the inventory group it applies to:
# roles/firewall/defaults/main.yml
firewall_subnet: 10.0.0.0/24
firewall_login_ip: 10.0.0.10

firewall_rules:
  - { group: controller,     port: "22",          proto: tcp, src: any,                        comment: SSH }
  - { group: compute,        port: "22",          proto: tcp, src: "{{ firewall_login_ip }}", comment: SSH from login node }
  - { group: controller,     port: "6817",        proto: tcp, src: "{{ firewall_subnet }}",   comment: slurmctld }
  - { group: compute,        port: "6818",        proto: tcp, src: "{{ firewall_subnet }}",   comment: slurmd }
  - { group: all,            port: "60001:61000", proto: tcp, src: "{{ firewall_subnet }}",   comment: srun callbacks }
  - { group: all,            port: "8004",        proto: udp, src: "{{ firewall_subnet }}",   comment: BeeGFS client }
  - { group: controller,     port: "8005",        proto: any, src: "{{ firewall_subnet }}",   comment: BeeGFS meta }
  - { group: controller,     port: "8008",        proto: any, src: "{{ firewall_subnet }}",   comment: BeeGFS mgmtd }
  - { group: controller,     port: "8010",        proto: tcp, src: "{{ firewall_subnet }}",   comment: BeeGFS mgmtd API }
  - { group: beegfs_storage, port: "8003",        proto: any, src: "{{ firewall_subnet }}",   comment: BeeGFS storage }
# roles/firewall/tasks/main.yml
- name: Allow cluster services
  community.general.ufw:
    rule: allow
    port: "{{ item.port }}"
    proto: "{{ item.proto }}"
    from_ip: "{{ item.src }}"
    comment: "{{ item.comment }}"
  loop: "{{ firewall_rules }}"
  loop_control:
    label: "{{ item.comment }}"
  when: item.group == 'all' or item.group in group_names

- name: Deny incoming by default
  community.general.ufw:
    default: deny
    direction: incoming

- name: Enable UFW
  community.general.ufw:
    state: enabled
Unlike shelling out to ufw, the community.general.ufw module is idempotent and supports --check, so a dry run shows exactly which rules would change. Every allow rule, including SSH, is in place before UFW is enabled. Even so, roll it out to login01 alone first (--limit controller) and confirm you can still SSH in before doing the rest.
Verification
Run these from login01:
# MUNGE: a credential made here decodes on a GPU server
munge -n | ssh admin@gpu01 unmunge            # STATUS: Success (0)

# BeeGFS: all nodes and targets registered, /home mounted everywhere
sudo beegfs health check --mgmtd-addr login01:8010
ansible all -m command -a "findmnt -n -o FSTYPE /home"   # beegfs on every node

# Slurm: controller up, nodes idle
scontrol ping
sinfo -a
Then the real test. As a cluster user (alice, not admin), start two single-GPU jobs without --mem:
srun --gres=gpu:1 bash -c 'nvidia-smi -L; sleep 60' &
srun --gres=gpu:1 bash -c 'nvidia-smi -L; sleep 60' &
squeue
Both jobs should be RUNNING at the same time, and each nvidia-smi should list exactly one GPU. That single test exercises the firewall (srun callbacks), device isolation, NVML detection and the default memory allocation. With two or more GPU servers, srun -N2 --gres=gpu:1 hostname also confirms multi-node launches get through the firewall.
Adding a GPU Server
This is where the design pays off. For a new gpu04:
- Prepare the node, build its RAID, copy
conn.authandcert.pem, and register it as BeeGFS storage node 4, target 401, with the interlock. Mount the client at/home. - Add
gpu04tocomputeandbeegfs_storagein the inventory, and changegpu[01-03]togpu[01-04]inslurm.conf(after checking thatslurmd -Con the new node reports the same hardware). - Run the playbook.
No Slurm file is ever copied to the new node; it fetches its configuration from login01. Existing BeeGFS data stays where it is, and new files start landing on the new target, which BeeGFS favors because it has the most free space.
Note: BeeGFS licensing counts machines that run
beegfs-metaorbeegfs-storage, not machines that only run the client. In this design that is the login node plus every GPU server. Check the terms of your license before growing past it.
Adding InfiniBand Later
Everything above runs over ordinary Ethernet. As the cluster grows, the bottleneck becomes bulk data: BeeGFS traffic between servers and NCCL traffic for multi-node training. InfiniBand fixes that without changing the architecture; the Ethernet LAN keeps carrying SSH, Slurm and BeeGFS metadata, and IB becomes the data plane next to it. I have not deployed this yet, but three things are worth knowing in advance:
- Two servers do not need a switch. Cable the adapters back to back and run
opensmon one host, since an IB fabric needs a subnet manager and that is normally the switch’s job. From three servers on, use a switch. - BeeGFS can use RDMA directly. Once the IB interfaces are up, list them first in
connInterfacesFileso BeeGFS prefers them. Existing data does not need to move. - RDMA bypasses the firewall. RDMA transfers never pass through the kernel’s IP stack, so UFW does not see them. Connection setup over IPoIB does, so the BeeGFS ports still need allowing from the IPoIB subnet.
Troubleshooting
Home directories are missing on one node. Run findmnt /home before touching anything. If it prints nothing, beegfs-client failed to start and you are looking at the local /home underneath, which only contains admin. Nothing is lost, but anything written to /home in this state goes to the root disk and disappears from view once BeeGFS mounts again. Check systemctl status beegfs-client and lsmod | grep beegfs; a kernel upgrade without matching headers is the usual cause.
The storage service refuses to start after a reboot. That is the interlock working. The RAID array most likely did not assemble, so /data is not the filesystem named in storeFsUUID. Check cat /proc/mdstat and findmnt /data, and fix the mount. Do not set storeAllowFirstRunInit = true to make the error go away: that creates a new, empty target.
The admin account sees no partitions. With AllowGroups=users, Slurm hides the partition from accounts outside users, so sinfo and scontrol show node print nothing and look broken. Use sinfo -a or sudo scontrol show node gpu01.
Conclusion
None of the pieces here are exotic. Slurm, BeeGFS, UFW and Ansible are each well documented. What takes time is how they interact: numeric UIDs on a shared filesystem, a firewall that blocks srun but not sbatch, a memory default that silently turns a four-GPU node into a one-job node, a storage daemon that will initialize an empty target if you let it.
Get those right once, encode them in a playbook, and the cluster stays boring as it grows: a new server is a short manual setup, two inventory lines and a playbook run, and no existing node is ever edited by hand.
The Disqus comment system is loading ...
If the message does not appear, please check your Disqus configuration.